5 Space Options for Running a Dojo
If you’re thinking about starting your own dojo or running your own martial arts classes, the first thing you need to look for is a space in which to run them. There are a number of different options, all with their own pros and cons. I’ve run classes in 6 different locations over my tenure, so I can help you understand your options.
1. Basement/Garage
Pro:
- Low overhead.
- Very convenient.
- Complete control over use of the space.
Con:
- Space is limited.
- You have to purchase your own mats and equipment.
- You have to bring relative strangers into your home.
- Encroaches your own living space.
2. Community Centre/University
Pro:
- Free publicity for your class through their network.
- Little to no start-up costs if mats are not required or already provided.
Con:
- Some pay you by the hour, limiting your profit potential.
- Highly competitive. Can be difficult to get in.
- Lack of control over your space. May not be able to come early or stay late if desired.
3. Martial Arts, Yoga or other Studio Rental
Pro:
- More control over use of the space.
- May not have to buy mats or equipment if already available (martial arts studio).
- More potential for growth.
Con:
- Lack of control over your space. May not be able to come early or stay late if desired.
- If the business goes under, you’re stuck without a place to train.
- May have to set up your mats and put them away before and after each class.
4. Industrial Space
Pro:
- Complete control over use of the space.
- Tends to have more space.
- Lots of room for growth.
Con:
- Higher overhead costs.
- Higher risks for financial loss.
- You have to purchase your own mats and equipment.
- Little to no walk-in traffic. Can be hard to find location.
- May have to deal with noise from neighbours.
4. Retail Space
Pro:
- Complete control over use of the space.
- More room for growth (depending on space).
- More exposure and walk-in traffic.
Con:
- Highest overhead costs.
- Higher risks for financial loss.
- You have to purchase your own mats and equipment.
- Less privacy. People may walk in during classes or stare from windows.
When I started running my own classes outside my original dojo, the first place I taught was in a community centre in Japan. It was highly convenient and very appropriate for the transitory nature of my life there. We sometimes had to share the space with other people, but it was such a huge space that it didn’t really matter.
After I moved to Vancouver, I was fortunate enough to hook up with a Judo dojo that was being run out of an industrial space. The owner was very helpful in getting me started. Unfortunately, he left the country and the dojo closed down leaving me without a space. I did, however, get the mats which came in handy.
For about a month, I taught out of a garage in one of my students’ home. We had 8 mats. It was only enough space for 2 pairs to train, and even then it felt pretty confined. It was tight, but at least we kept it going.
After that, we settled into a yoga/pilates studio. It was very affordable, but limited in space. Plus, we had to set up and tear down the mats after each class.
About 8 months later, I moved into an MMA/boxing gym where I rented the space. We didn’t need our mats (they already had some) so we just stored them under the boxing ring. The lack of privacy was sometimes frustrating though because people sometimes walked through our mat space as they finished class in the other room. They also didn’t always take off their shoes (The horror, the horror…).
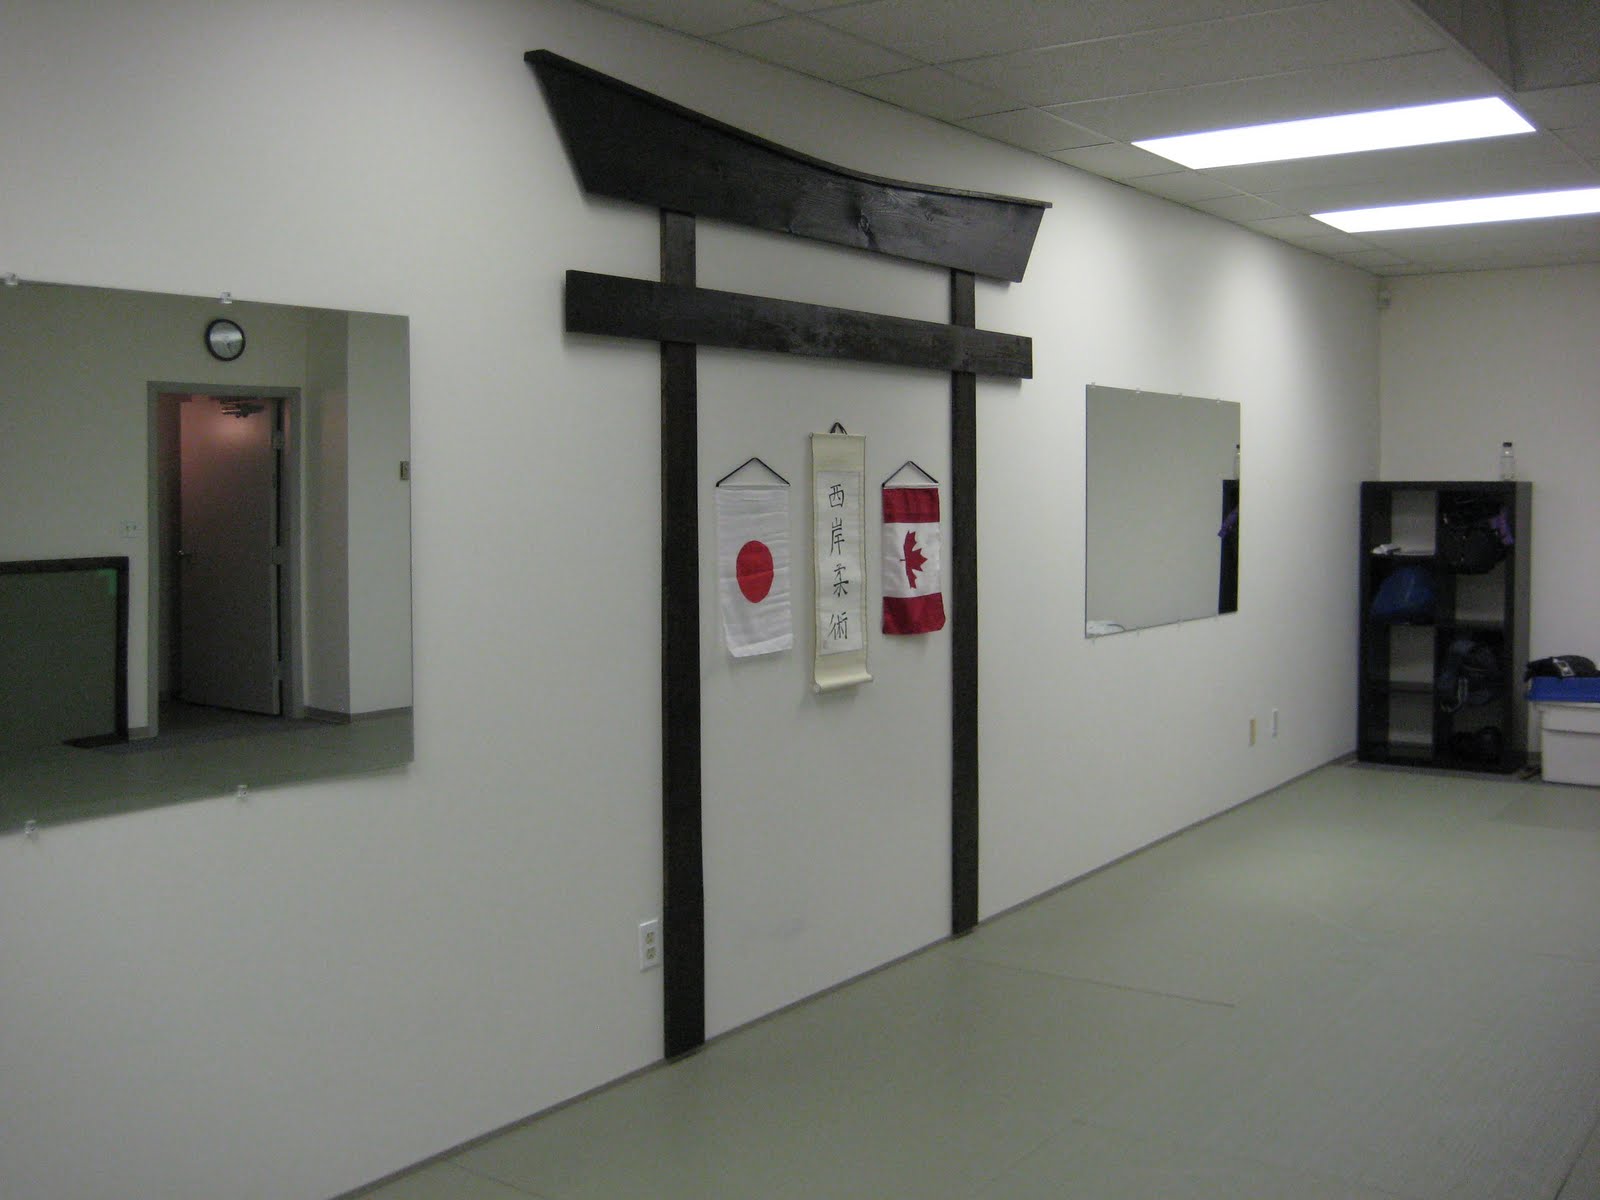
While at that gym however, I managed to meet Louis Sargeant, with whom I got along swimmingly. We eventually got together on a lease for an industrial space that had two separate areas on two separate floors for training. I took the upstairs office (room enough for 28 mats) and he took the warehouse. This is my best space yet and we’re still doing quite well. Here’s a pic of my dojo below.
 One day, I would like to somehow, some way, buy land and build my own Japanese-style dojo. My vision is to plan a building specifically around my needs, big enough to have a 64-mat training area, men’s and women’s changerooms with showers, a small office for myself, a lounge/viewing area from which the training space can be seen, and a beautiful Zen garden that can be seen from the training area. It’s a beautiful dream that I will realize if the right circumstances allow me to make it happen.
I’d love to hear what kinds of spaces you all train in and their unique advantages and disadvantages.
Top 5 Cross-training Activities for Martial Artists
As an instructor, I’m often asked what types of exercise I recommend outside of our classes for cross-training. If you’re looking for a complementary cross-training activity, it’s important to choose something that helps develop the type of body that allows for the style of movement you’re trying to develop as a martial artist. Here is my list of 5 activities that I recommend to my students:
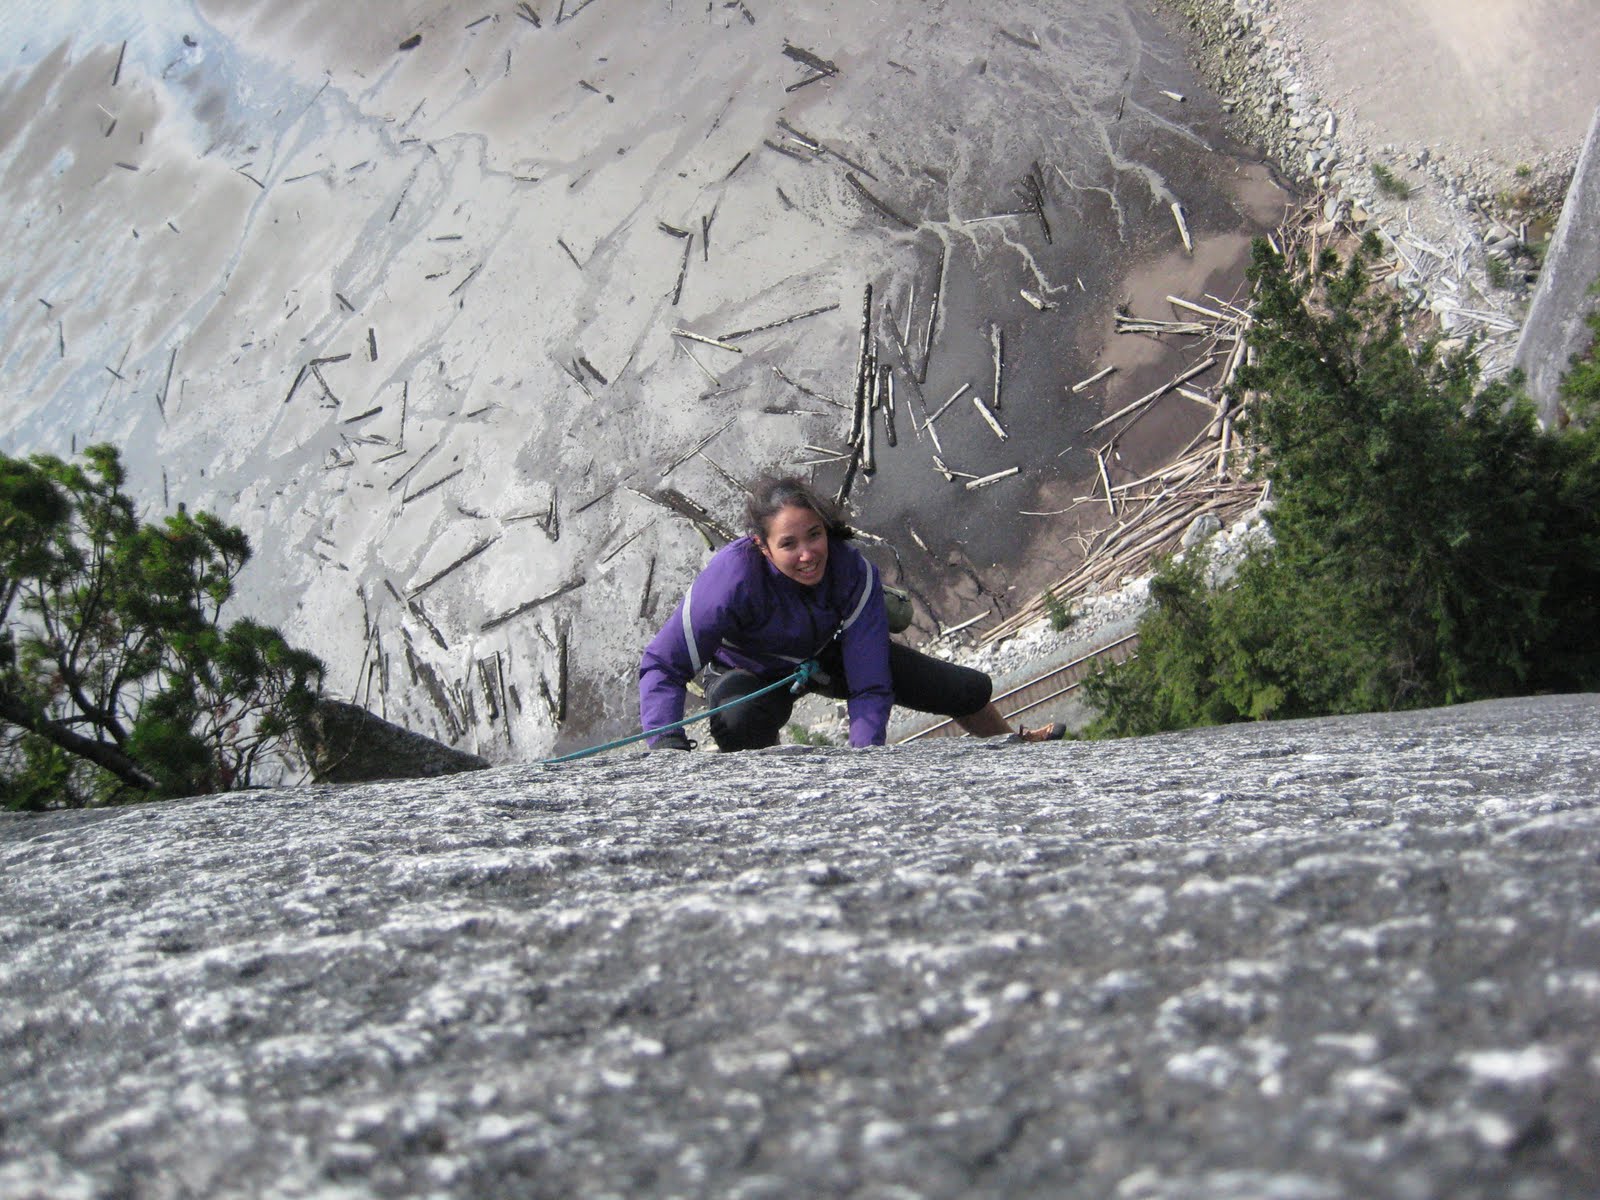
1. Rock/Wall Climbing. Climbing is an excellent activity for martial artists because you use the entire body to do it. It tones the body without bulking up and develops muscular endurance. It can also help develop flexibility, depending on your climbing technique. Furthermore, it involves a great deal of technique in order to be an efficient climber, a principle martial artists should become very familiar with the longer they train. It’s also great for developing a strong grip, which is important for grapplers. Whether you do it on an actual rock face or at a climbing gym, you’ll get these benefits. I like to go climbing outdoors in Squamish (see below) in the summer and wall climbing in the winter.
2. Yoga. Like climbing, yoga tones the whole body. It tends to be a lower impact activity with strong emphasis on stretching, making it a good recovery exercise for the day after a particularly hard workout. It’s also great for increasing overall flexibility, which is important for injury prevention. What’s nice about yoga, is that it’s easy to fit into your daily training regimen. I have a couple of series’ of 20-minute workouts on DVD (including Am Yoga for Your Week – DVD) that I use every weekday when I get up in the morning. If you’ve never done it before, it’s a good idea to also take classes so you develop proper technique.
3. Running and/or Skipping. As a martial artist, it’s important to have good cardio. Aerobic exercise is important when prepping for belt tests to keep you performing strong even toward the end of the test. Anaerobic exercise is important for high intensity activities over the short term, like sparring, grappling, training circles, or for the potentially high intensity situation of a real self-defense situation. Both running and skipping are great forms of cardio training. Running can be adapted in different ways too like interval running (switching between regular running and sprinting), running up hills or stairs to develop leg strength, etc. Many people don’t think they can run, believing it to be too hard on their particular body. Unless you have some sort of injury that prevents it, everyone can run. You just have to start slow and work the body up to it. Start by walking more than running. Start by walking 4.5 minutes and running half a minute, repeating this for 30 minutes. Then, every time you go to run, increase the running and reduce the walking in each interval by 30 seconds until eventually you’re running the full 30 minutes. Skipping is good for cardio training and also develops timing and coordination. You can also do interval training by adding in double skipping into your routine. See the video below for an example of double skipping.
4. Strength Training that Uses Core Muscles & Stabilizers. This includes pilates, fitness ball, kettle bell, medicine ball, and many types of isometric exercise. Many people want to do a form of strength training in addition to their martial arts training, but most people think only of weights. Weights, the way they are traditionally used, focus more on the “mover” muscles, the ones that propel you, but don’t do as much for the “stabilizer” muscles, which hold your parts in place and prevent you from being damaged while the movers are moving you. The stabilizers are very important for martial artists to protect you, especially when doing explosive movements. Developing your core usually goes hand in hand with your stabilizers because your core (abs and lower back muscles) stabilizes your centre body. A lot of important movements come from the core in the martial arts, so it’s important to develop your core strength.
5. Dancing. This may seem like a strange choice, but some of the finest martial artists I’ve trained came to it with a background in dancing. Dancing teaches coordination, timing, choreography and body awareness. Couple dancing forms like swing or salsa give you the added benefit of learning to coordinate body movements with someone else’s movements, which is a great skill to develop for things like throwing. You may laugh or have trouble seeing the relevance, but the skills you learn in dancing have a lot of cross-over into the martial arts.
These are my top recommendations but I’d love to hear what other people do or recommend though in the comments for this post. 🙂
Taking Care of Joint & Muscle Strains
 Jiu-jitsu, or any martial art for that matter, is very physical. It’s not unusual for people to get minor joint strains or muscle pulls from time to time. Sometimes they last for a day or two. Sometimes they last longer, particularly when no action is taken to care for them.
People often ask me for suggestions for taking care of such injuries. So I’ll share here what I normally do. The most important thing to do is take care of the injury as soon as it occurs. People often tend to let it go and train through it when it’s something minor. This is a mistake because the onset of an injury sets the tone for your recovery.
As soon as the injury occurs, you should follow R.I.C.E. (Rest, Immobilization, Cold, Elevation). I also like to use anti-inflammatory agents to reduce pain and swelling. I use either ibuprofen (Advil) and a topical anti-inflammatory or both. The topical anti-inflammatory is a great trick of the trade. If it’s only a very minor strain, sometimes I’ll just smear some on the site of the injury then wait until after class to do cold therapy. If it’s a more serious injury, I apply it along with the cold therapy right at the onset of the injury.
There are a couple of options for topical inflammatory agents. The one I’ve used most is arnica gel. I always keep a tube of this stuff in my dojo first aid kit. Many of my students have tried it and found it to be effective. Some even bought their own to carry in their training bags. Another similar treatment is the Escents Aromatherapy Arthritis, Muscle & Joint Treatment gel. It has arnica in it as well as essential oils that are thought to help promote healing. I tried it a couple of times on minor joint strains and found it to be effective.
For ongoing injury care, don’t skimp on the cold therapy. I know it’s time consuming, but it’s very important for reducing your recovery time. You should apply cold to your injury regularly for the first 48 hours of your injury. Be sure to follow the rule of 15 minutes on, 15 minutes off so as not to irritate the surrounding tissues. That combined with anti-inflammatory agents (ingested or topical) will promote faster healing.
You should also go see a doctor to find out the extent of your injury and whether or not you should get ongoing care like physical therapy. After the first 48 hours, R.I.C.E. usually becomes M.I.C.E. (Movement, Immobilization, Compression, Elevation). “Movement” is often recommended to increase blood flow to the injury site to promote healing and to strengthen surrounding muscles to protect the joint. For example, my doctor recommended doing lots of cycling to help with my knee injury.
Of course, I need to point out that the contents of this blog post are not intended as medical advice. It’s just what I’ve had recommended to me and have found works well as a recovery strategy from experience. Every case is different, so you should always consult a doctor about your own specific injury.
How to Create Your Own Basement Dojo
I’m at the dojo a lot, but sometimes it’s nice to have your own training area in your home so you don’t have to go out to the dojo to work on a bag or do some casual training with a friend. To that end, I set up a basement dojo in my home.
The problem with setting up a home dojo is that you may not have the room to spare to have an area dedicated to training alone. That’s why I set mine up in a way that allows it to double as a playroom by being creative with furniture choices.
Here are some photos of my basement in “playroom mode”:
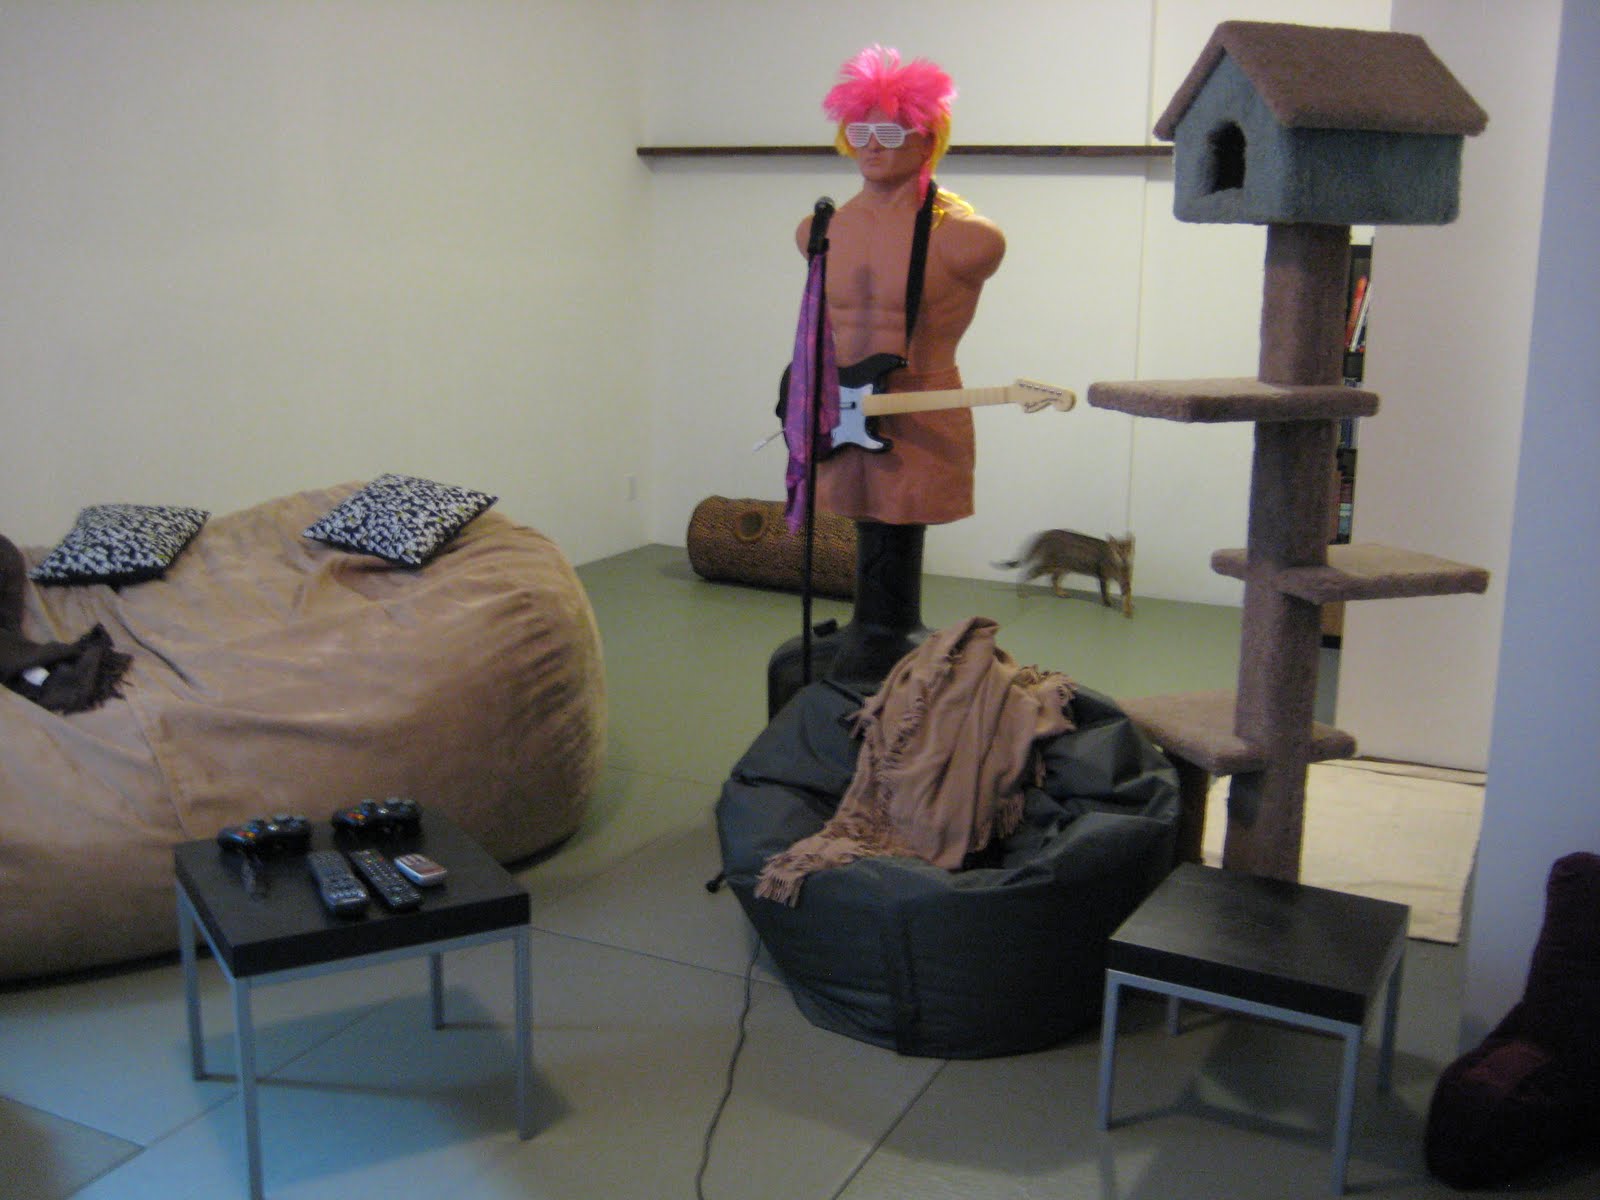
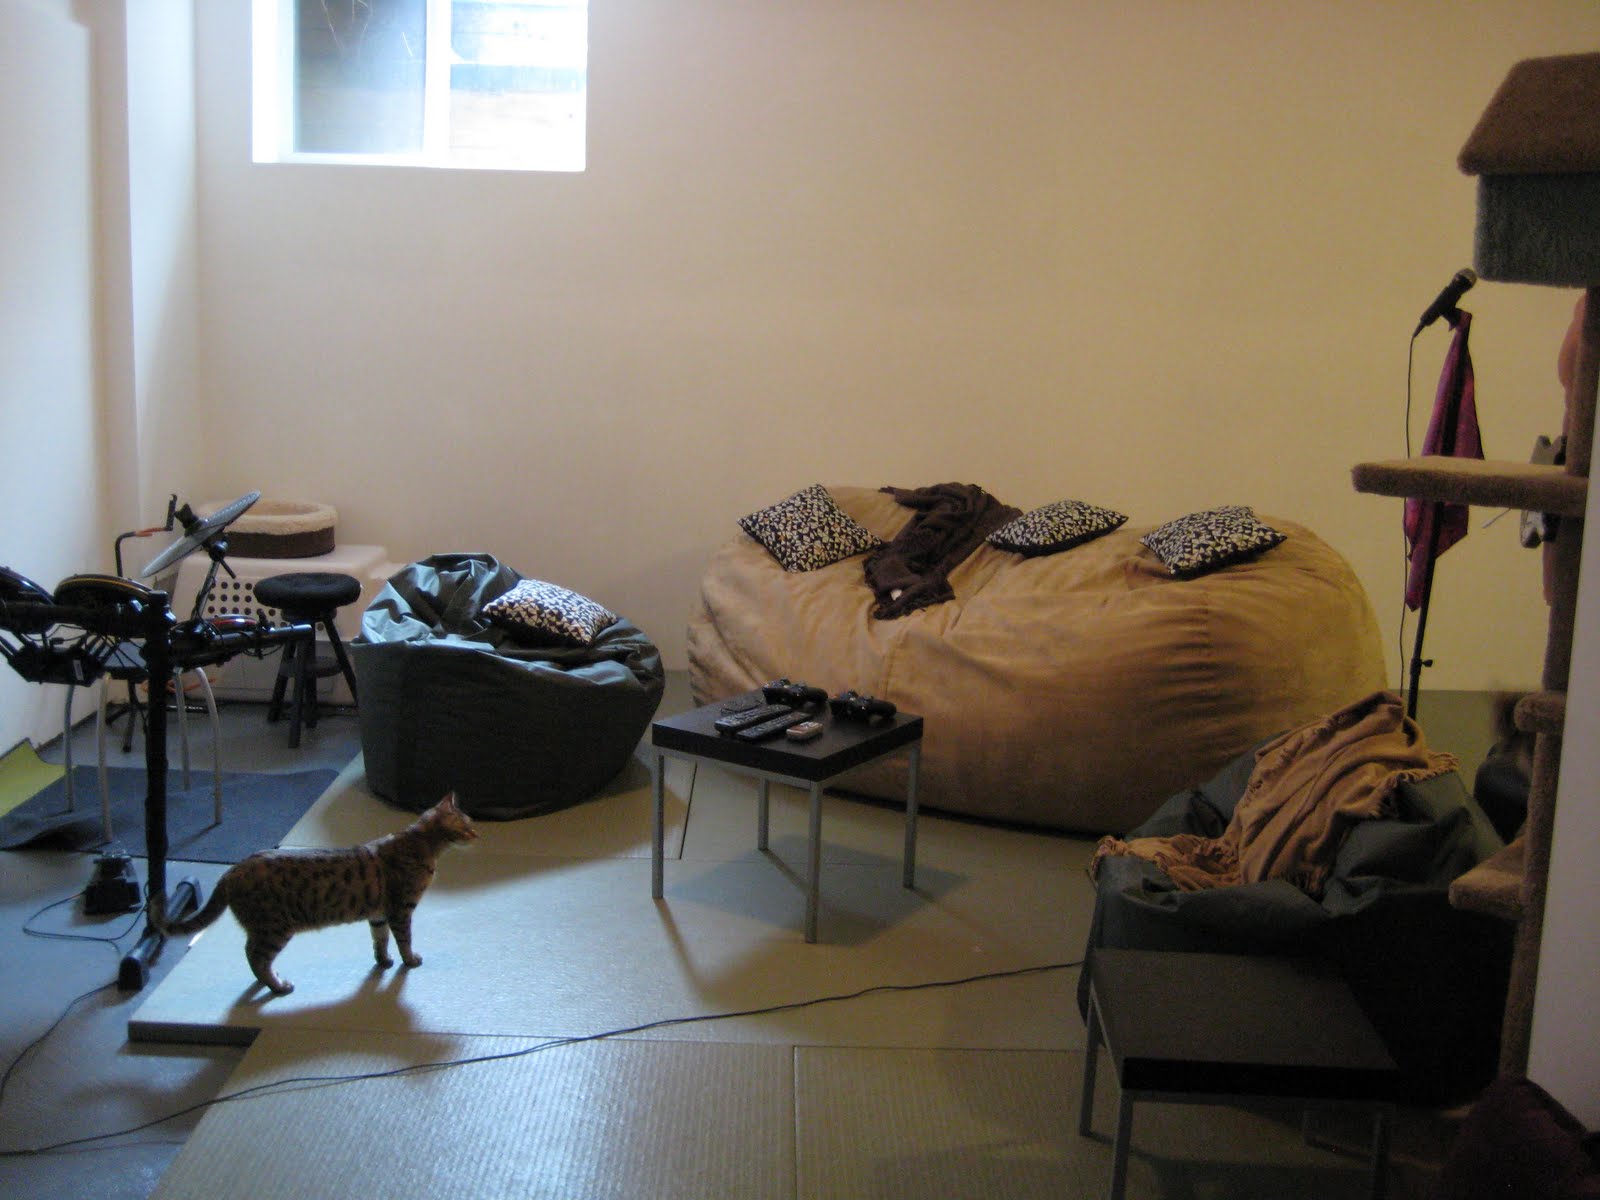
I used bean bag furniture for seating, including a bean bag sofa and two Sumo omni bean bag chairs, which can be molded into different shapes for sitting or lounging. Bean bag furniture can be easily moved and tossed aside as necessary. I also used the Ikea Klubbo nesting tables, which are easily stowed and moved. B.O.B.’s vanity can come out at will. It’s fun to dress him up and make him novelty item on Rock Band nights, Halloween and various other occasions.
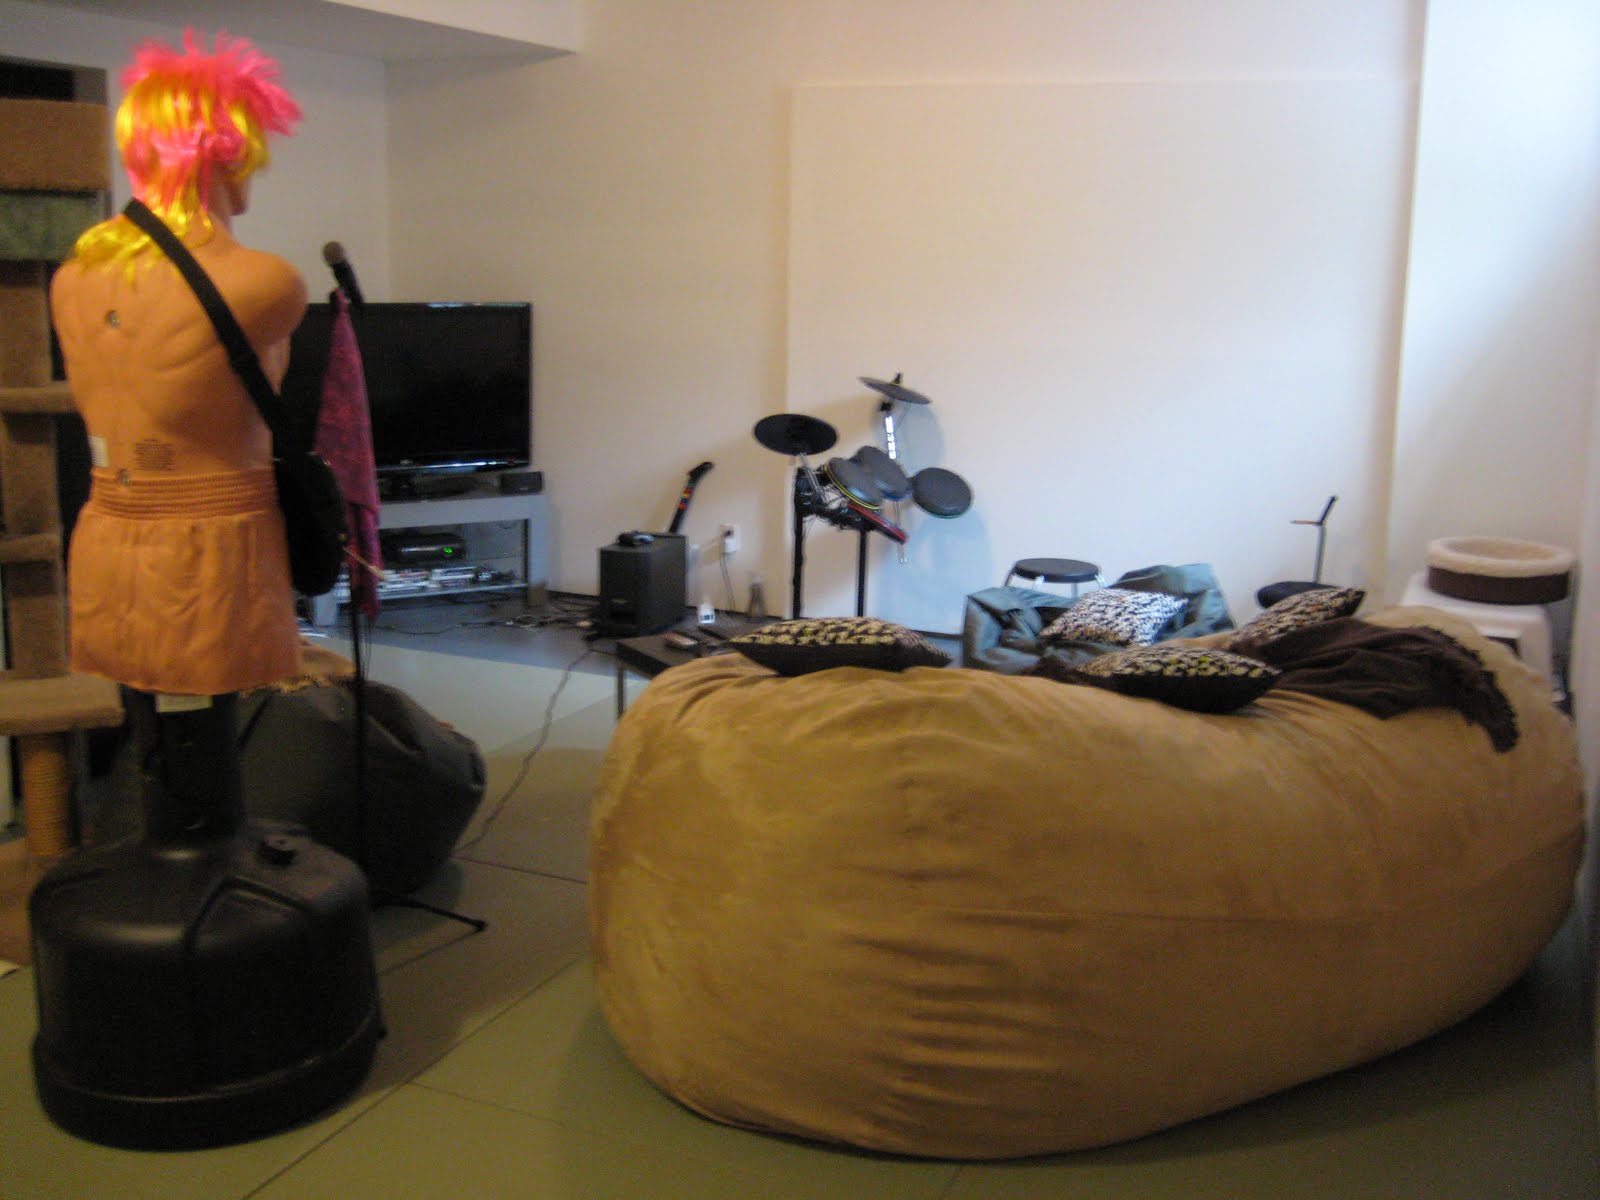
Flexible furniture that is easy to move and stow is the key. I don’t have kids, but I’ve been told that this would also make a great play area for kids. And when you’re up for some training, you just toss all the furniture off to the side and have at it. Here are some photos of my basement in “dojo mode”:
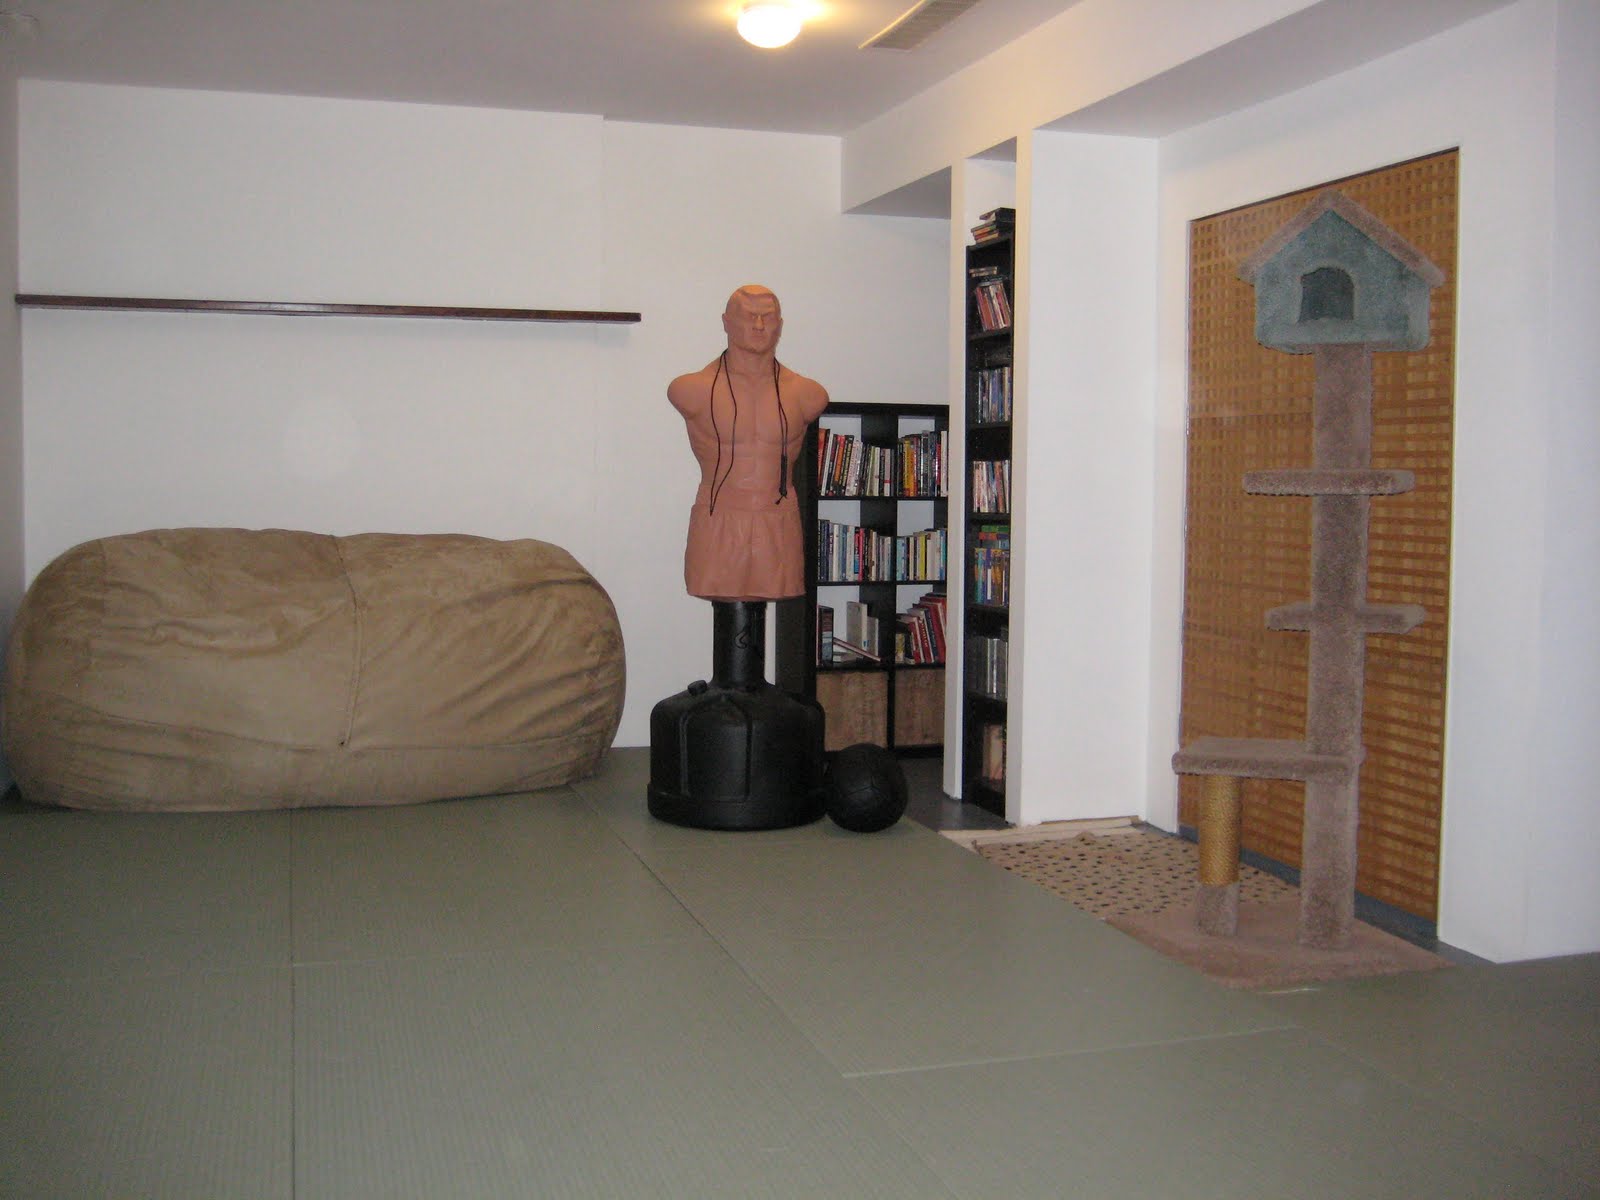
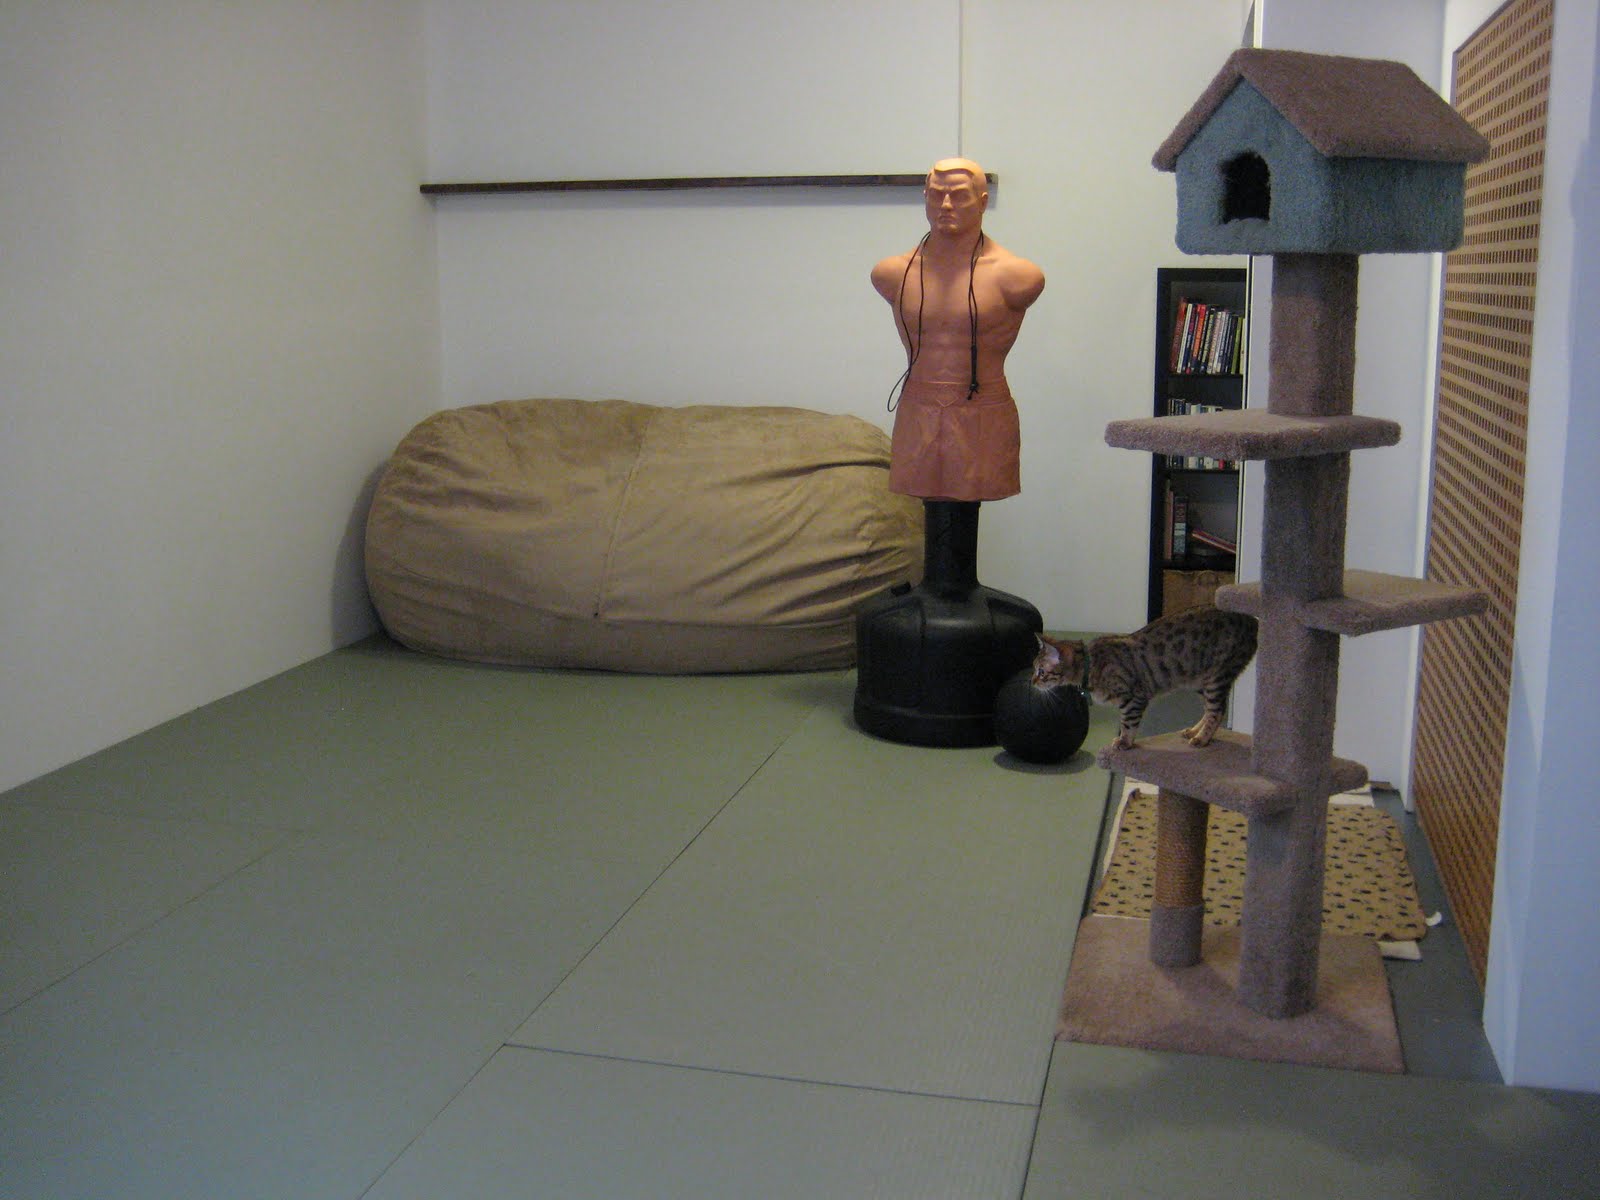
Using a B.O.B. or other free-standing heavy bag makes it easy to move it around as necessary. I also have a few other work-out tools that are easily stowed, including a medicine ball, a kettle bell, a skipping rope, and a few striking pads. To give you a better idea of what the space is like, we have 11 tatami mats set up in our basement.
We love our basement, both for parties and training. It’s the perfect solution for us. It can also be a good option for an instructor who wants to teach but can’t afford to lease a space. Anyone else out there have a basement dojo and have any of their own tricks to share?
The Importance of Self-Belief in the Martial Arts (or Anything!)
 Having taught Jiu-jitsu to hundreds of students over the years, I’ve come to realize how fundamentally important self-belief is in a student’s performance. A student’s level of optimism or pessimism about his or her own abilities plays a major role in their development.
Here are a couple of quotes to get you thinking:
“All that we are is a result of what we have thought.” – Buddha
“Whether you think you can or think you can’t, either way you are right.” – Henry Ford
I’ve dealt with a number of pessimists over the years. They tend to believe that they are in some way at a unique disadvantage over everyone else. They think they could be better in their training if they weren’t so small, so big, so frail, so old, so weak, so lacking in talent, so unfit, etc.
The pessimists with the least self-confidence tend to give up on their training very quickly, thinking that they are so disadvantaged that there’s no point to it. But it’s not necessarily the case that pessimists don’t try in their training. In fact, some pessimists try harder than anyone else on the mats because while they believe strongly in their disadvantages, they train extra hard to make up for it.
To counter their pessimism, they might trick themselves into doing well by working very hard, believing it’s the only way they’ll succeed. And they’re right. Progress comes at a high price for pessimistic students. They work so hard and put themselves under so much pressure that ultimately burn themselves out. The training stops being fun and they end up quitting sooner or later.
Optimists, on the other hand, have strong self-belief. They make the most of their unique bodies and minds, seeing themselves as having unique advantages rather than disadvantages. When they face challenges, they don’t see them as resulting from fundamental problems about themselves. They have faith that most challenges are things they’ll overcome in the moment or over the course of their training. The stronger the belief a student has in their own abilities, the more quickly and effortlessly their progress comes to them.
“I am an optimist. It does not seem too much use being anything else.” – Winston Churchill
Students best serve themselves by being optimistic about their training. I believe that it is the martial arts teacher’s role to guide students toward a more optimistic approach toward their training. I don’t mean blind optimism here. You can’t just tell students “You can do it!” all the time. Particularly with pessimists, you have to build a case for it. You have to make them believe it and to believe it yourself, so it has to be realistic to both of you. They need to have the positive side of their unique traits emphasized and to be shown how they give them advantages. It also helps for them to hear of the successes of people who share their similar body types.
Teaching a martial art isn’t just about showing people a set of moves and techniques. It’s about teaching self-belief. And that’s why the martial arts can have such a positive impact in people’s lives outside their training. Or so Mr. Miyagi would have us believe ;).
Foam Rollers as an Alternative to Massage
Last weekend I took a short course on using foam rollers. Foam roller exercises offer many of the same benefits of massage therapy without the massive expense. It’s not all that uncommon for fitness centres to have foam rollers available to their clients. If they’re new to you, I’ll explain how they work.
How Foam Rollers Work
Foam rollers allow you to do myofascial release, a type of body work in which the practitioner applies gentle, sustained pressure on soft tissues while the superficial fascia is in traction.
The superficial fascia is a soft connective tissue just below your skin. It wraps and connects the bones, muscles, nerves and blood vessels of the body. Together, muscle and fascia are known as the myofascia system.
For various reasons including disuse, lack of stretching or injuries, the fascia and the underlying muscle tissue can become stuck together. This is called an adhesion, and it is known to restrict muscle movement. It also causes pain, soreness and reduced flexibility and range of motion.
Myofascial release softens and lengthes the fascia and breaking down scar tissue or adhesions between muscles, skin and bones. It has also been shown to relieve various muscle and joint pains such as IT band syndrome and shin splints. It also helps improve flexibility and range of motion.
Foam rollers are inexpensive (mine cost $34 Canadian taxes included) and with a bit of experimentation you can target just about any muscle group.
Foam Roller Exercises
The focal point of the seminar I attended was longitudinal immobilization, which is simply lying straight on the foam roller. The very act of lying on it, without doing any special movements, helps release tension along the spine and in the shoulders. It also helps improve posture and some research suggests that it helps increase total strength.
Here is a brief video showing how to do longitudinal immobilization:
In addition to lying on the foam roller, you can also tilt and shift your head to the sides for additional stretching for the shoulders. This really helps with a particular trigger point in my right shoulder that develops regularly on me from using a mouse. We also leaned the shoulders and hips off the foam roller to stretch the upper and lower back. I say “lean” but it’s more like spilling different parts of your body off the foam roller than gently drawing them back up again.
Our instructor also showed us a stretch for the IT band, the muscle area along the outside of the thigh. It can be quite painful, particularly if you use this muscle group a lot for things like kicking or running. But if it is painful, it means you probably really need this kind of stretch.
Here’s a video showing the IT band stretch using a foam roller:
This article really only scratches the surface of how these foam rollers can be used. If you have a particular part of your body you want to work on, chances are you can find a video on how to use a foam roller for it on YouTube. And here is a great article on fascia and myofascia release from Men’s Health Magazine.
Everything I Need to Know I Learned from Doing Hip Throws
 The more years I do hip throws, the more I seem to get out of it. At first it was simply the joy of slamming someone down on the ground effortlessly… Who am I kidding? I still enjoy that. But now I look at the hip throw and see how it has many parallels to life in general. Here are a few examples:
“Break the balance first and the rest is easy.” When throwing someone, you break their balance first otherwise it is much more difficult, sometimes impossible, to throw them. As a metaphor for life, I’ve learned that when trying to accomplish a goal, it’s important to do all the necessary preparations first so that things proceed smoothly.
“If you want to break someone’s balance, you have to get lower than their centre of gravity.” When it comes to hip throws, you have to bend your knees and get your hips lower than your uke’s hips. As a metaphor for life, I’ve learned that if you follow sound strategy and put your efforts on the right things you can accomplish much more with a lot less work.
“Once you’ve broken the balance, don’t wait; throw your uke immediately.” When beginners start doing hip throw, they often wait too long before throwing once the balance is broken. This leads to the person getting tired as they support their uke’s weight, particularly if uke is heavier than them. As a metaphor for life, I’ve learned that there’s no point in carrying emotional burdens. It tires you out and makes life seem heavy. Once you’ve dealt with a problem appropriately, “throw” it away and move on.
“Even the very small can throw someone much larger with proper technique.” I’ve taught women the size of a 12-year-old to throw men twice as heavy than them. Many of these women thought it would be impossible, but they were able to do it thanks to good technique. As a metaphor for life, I’ve learned that even when things seem impossible, it’s always worth it to try, armed with the right information. Life can be full of surprises.
In addition to the above, I’ve learned that I’ve been doing Jiu-jitsu for waaaaay too long. 😉
My Promotion to Yondan
I have some good news to share here on the blogosphere. After reviewing my 6,000 word written thesis on knife defense, as well as my teaching skills in a recent knife defense course that I instructed, among other things appropriately chosen by my superiors, my Sensei, Ed Hiscoe Shihan, informed me that I am to be promoted to Yondan, 4th degree black belt, in the art of Can-ryu Jiu-jitsu.
My belt will be presented to me by Steve Hiscoe Shihan (my Sensei’s son) at the upcoming black belt seminar in Chilliwack, BC. I’ll be teaching a two-hour course covering higher level ground defense curriculum that day. This is another milestone in my 17-year career in the martial arts.
Thanks everyone for all your support past, present and future!
How to Use Your Whole Body to Improve Martial Arts Technique
One of the things that is very much appreciated by students of the martial arts is how regular training not only makes you good at the martial art you’re studying, it also has a way of making people better at other physical pursuits. One aspect of this comes from the way martial arts helps you to integrate your entire body into your movements for maximum power and efficiency. Whether you’re throwing a punch, applying a joint lock, batting a baseball or throwing a football, there are three things you can do to help integrate your entire body.
1. Initiate Movement from the Hip. When you initiate any techniques with hip rotation, it allows you to coordinate the power of your lower and upper body for more efficient, more powerful movements. When throwing a punch, for example, if you initiate the punch with the rotation of your hips, it allows you to engage the muscles of your leg, core, upper back and shoulder muscles. When you start your movement from the hips, all the muscle energy of these body parts can be coordinated. The energy then travels up through the body and materializing into your punch, much like a whip. See The Difference between Fine and Gross Motor Striking Skills Part 2 for details.
2. Stay Loose. For your body to be used like a whip, it must be loose and supple. Think of how a whip works. It flexes all the way up the length of the whip so the energy can travel through and explode out the end. If there is any stiffness in the whip at any point, the energy would stop dead at that point. This is also true of the body. If you’re throwing a punch, and you’re stiff in the shoulders, for example, it won’t matter how well you use your hips. The energy would get caught up within the stiffness of the shoulders, preventing you from using your whole body. You must therefore stay relaxed and loose so the energy can travel.
3. Breathe Strategically. Your breath is a good way to both focus your movements and relax your body. By initiating your breath from deep within your core from the diaphragm or from the Hara/Tanden area, it helps you maximize the use of your core muscles. Breathing out also helps release tension in the body, allowing energy to flow freely. You can do all this by timing your breath with your punch, initiating your breath as your engage your hips and completing your breath as you make contact.
By using these 3 principles effectively, you’ll see a big difference in how much power you can generate and how much more effortless it will feel. These principles can also be used to improve joint locks, breakfalls and throws, though it’s easier to describe when it comes to strikes.
Reacting to Aggression: How to Avoid and De-Escalate Conflict
In light of the Vancouver-area women’s self defense class I’m running this weekend, I was thinking about the different reactions to aggression in day-to-day life and how the vast majority of physical fights can be prevented with assertive conflict avoidance and de-escalation strategies.
There are 3 main ways people react to conflict. The first two I’ll discuss below are the ones most people use. They are the reactions people have when they give in to their conditioned fear-based adrenal responses in the face of aggression. The third type of response is self-aware, allowing a person to keep their head and stay in control of the situation.
1. Passive Response: This is when a person under-reacts to aggressive behaviour. The person avoids eye contact, turns the shoulders away and/or hunches over. In a woman’s case they might allow aggressor to get close and make physical advances. Verbally, the person would be saying ‘No’ to the advances or saying that they don’t want any trouble, but they do so without confidence or in an unconvincing manner. When you take on a “scared rabbit” victim-like demeanour, it confirms to the aggressor that you’re an easy victim and can bring on further physical aggression and assault.
2. Aggressive Response: This is when a person over-reacts to a situation. They display a defiant attitude. The non-verbal communication that is usually displayed is hands on hips and/or puffed chest, firmly set jaw and direct, menacing eye contact. The person might also point their finger at the aggressor in a menacing fashion. Verbally, the person would talk back to them defiantly, oftentimes swearing. Basically, the person puts on a show that they’re unwilling to back down, which fuels the fire to the point where aggressor loses face and has no choice in his or her mind but to escalate things with a violent response.
3. Assertive mode: Responding assertively means assessing a situation and responding appropriately. Every aspect of the person’s response exudes non-threatening assertiveness. They stand in what we call the “interview stance,” both knees bent with the strong leg back and the hands up with palms open for protection in a way that looks non-threatening. The person has confident body language, which includes a straight back and firm but non-menacing eye contact and tone of voice. The person keeps a safe distance while talking. The verbal response is also assertive. A woman might say to a man’s unwanted advances, “Look I’ve already told you once that I’m not interested. Go away now!” Here is an example of what a man could say to an aggressor who is accusing him of hitting on his girlfriend: “Stay back now. We can talk things over just fine from there. I was just asking her where the washroom was. I didn’t mean anything by it. Let’s just all go back to having a good night, ok?” When it comes to verbal responses, a person should modify their intensity appropriately until the person backs off, whatever the situation.
Physical defense should only be used as a last resort when avoidance and de-escalation tactics have failed. By being assertive, not passive or aggressive, you can usually keep yourself physical fights.
 We're proud to announce that Lori O'Connell Sensei's new book, When the Fight Goes to the Ground: Jiu-jitsu Strategies & Tactics for Self-Defense, published through international martial arts publisher Tuttle Publishing, is now available in major book stores and online. More about it & where to buy it.